11/6/13

Bhindi Malai


Staring at Bhindi/Okra this morning, I was wondering what can I do differently - I came up with this recipe. Its basically a cross between Butter chicken and Chicken Tikka Masala style recipe. I thought it turned out good - but I put too much Bhindi/Okra for the amount of onion masala I had - The dish ended up having very less gravy. Perhaps next time, I would like to make this into more of a curry dish.  Let me know if you like the recipe.

Ingredients:
1.5 lbs Bhindi/Okra
1 medium red onion, finely diced
1/2 medium red onion, cut into squares
1/4 tp mustard seeds
Pinch of Fennel seeds
1 tsp cumin powder
1 tsp coriander powder
1/2 tsp turmeric powder
1 tsp red chilli powder
1 green chilli
1 medium tomato, finely choppd
1 tbp tomato paste
Paprika for color
1 to 2 tsp Shaan Tandoori BBQ Masala
1/8 cup heavy cream
Tava Fry Masala

Method:
1. Cut okra into medium big pieces.
2. Heat oil in a flat bottom non stick pan. Shallow fry the bhindi on high heat constantly moving the pan. Add salt.   The goal is to sear the okra and not just cook it. Also fry the okra in batches so as to not crowd the pan. Crowding the pan will cook the okra and make it too mushy. Towards the end of the searing process, sprinkle tava fry seasoning generously. Keep tossing the contents around.  Do not overcook the okra. Set aside. In the same pan, add a little oil and add the square cut onions. On high heat, sear the onions for 3 to 4 minutes. Set aside.
3. Heat oil in a pan. Add the mustard seeds - when they sputter. Add the asofoetida. Add fennel seeds. Swirl the pan around. Add the chopped onions and cook till translucent. Add the tomatoes and cook for good 10 to 15 minutes adding a little water at a time. The onion and tomato paste should be completely cooked and mushy. Add the tomato paste and mix well. Let cook til oil leaves on the side. Add the cumin, coriander, red chilli powder, turmeric powder, salt and mix. Let cook for a few minutes. Add a little water if you need to. The masala should be thick with very little water. Add the tandoori chicken bbq masala. and mix. Add the heavy cream and stir and let cook for a few minutes.
4. Add the okra and mix well. Let cook for a few minutes. Sprinkle some paprika for color (optional) Now add the seared onions and toss the okra with it. Serve hot.


10/30/13

Palak Masoor Biryani - Spinach and Lentils Biryani


Well this aint nothing like the real deal (Sigh) - Making Biryani from Palak and Masoor takes a lot of inner strength (we have gone to all veggie 6 days a week!) when you can just see chicken or mutton in the pot !!! But - this wasn't too bad!  Give it a try. 

2 cups of basmati rice
1/2 cup masoor
1 onion, cut lengthwise
Whole spices: 2 cloves, 1 inch cinnamon stick, 4 black peppercorns, 1 whole cardamom, 1 bay leaf
1/2 tsp turmeric powder, red chilli powder, cumin and coriander powder
2 tbsp tomato paste
4 handfuls of spinach leaves, finely chopped
1 tbsp garlic and ginger paste
2 tbsp Shaan Bombay Biryani Masala
Store bought fried onions
Pinch of saffron dipped in hot milk

Prep: Wash and soak the masoor (whole) for about 1 hour.  Drain the masoor.
Prep: Cook basmati rice. I cook mine in a microwave - 2 cups of basmati rice with 4 cups of water with some salt and olive oil. When the rice is done, I pour it out on a flat pyrex pan or a foil tray to let the steam escape. I add some olive oil to get it a little greasy when the rice comes to about room temperature. Add the saffron all over the rice.

1. Heat oil in a pressure cooker.  Add the whole spices and roast a little.
2. Add the onions and fry them till brown.  Add the tomato paste and mix well. Sautee till the mixture leaves oil on the sides.
3. Add the garlic ginger paste and sautee the mix for a few minute. Add the turmeric, chilli, coriander, and cumin powder.
4. Add the masoor and mix.  Add the spinach.  Add about 1 cup of water and pressure cook the masoor for just 1 whistle.  The masoor should be al dente - should have a bite to it.
5. When the whistle steams out, remove the lid.
6. Heat a little oil in pan. Add the spinach masoor mixture and sautee.  Add the biryani masala and some salt and cook until the water evaporates. You should have a thick mixture.
7. Now, we are ready to layer the biryani. You can either layer it in a stockpot or a foil tray. for both, add the masala at the bottom, layer some rice, followed by masala and then top it off with rice. Top it with fried onions.  Let it cook on simmer for about 20 minutes.  If using an oven, cover the tray with a foil and preheat the oven to 200F and steam cook for 20 minutes. 

10/28/13

Zunka Style Green Onions - Kanda Paath Bhaji


This is a very simple and basic Green onions preparation that I absolutely love with fresh hot chapatis. Zunka (Zoon-ka) is a rustic gram flour or besan (chickpea flour) dish that is prevalent in many Maharashtrian households. Adding green onions to it provides a little more fiber and a unique taste.

Ingredients:
2 bunches of green onions, remove and discard the bulbs at the bottom - Chop the green onions separating them into white parts and green parts
1 small red onion
1/8 tp mustard seeds
Dash of asofoetida
2 kokums (optional)
3 tsp besan of chickpea flour
Spices: 1/8 tsp each of turmeric, red chilli powder, cumin and coriander powder (add more if you like it spicy)

Method:
1. Heat oil. Add mustard seeds and when they crackle add hing.
2. Add finely chopped red onions and kokum. Sautee till golden brown
3. Add the chopped green onions and toss well.
4. Add some salt, turmeric and red chili powder, cumin and coriander powder.
5. Cook the green onions until it wilts significantly.
6. Add about 3 tsps of gram flour or besan (sprinkle each tsp as you mix it with the green onions)
7. On medium heat, work the contents as the two mix well.
8. Add about 1/4 cup water (a little at a time) as you keep mixing the contents. Let the besan cook either covered or open for 5 to 8 minutes.
Adjust seasonings - salt/sugar


8/19/13

Towards a healthier life....

Well the day has come for my Amma and Api (in laws) to leave and for my cooking escapades to begin again. Two kids, dance school, home making, fitness and cooking - all this to be juggled with the slew of festivities that are awaiting in the near future. Let us see how I do - I am sure I will survive just like everyone else is and has been surviving. Life is going to be fast paced - lots of sacrifices (even more than I am making now) - standing lunches, lost sleep (wait that cannot happen as I am already not getting any), and perhaps some more stress of juggling life and work and family and oh! THE social life (root cause of all evil).

But, as I start my journey back to cooking and blogging, I have vowed to make sure to atleast "think" if not act right away about not comprising health for convenience. I have always been good about cooking home cooked meals (as you can see through the blog) - but upon doing some thinking over the last few months I have come to realize that what I have been thinking is healthy may not be as healthy after all; what I have known is healthier than what I have been eating needs to be incorporated into my diet, and what I have quietly been consuming under the excuse of "just this last time" needs to leave my life...

There are a slew of things that I want to evaluate and eradicate from my house - Orange juice, Milk, Eggs, Meat in general, energy bars, canned soups, canned beans, canned sauces, salad dressings, candy, whole wheat bread, margarine, shredded cheese, diet coke, flavored yogurts.... the list is endless

And then there are a slew of things that I want to incorporate in my diet - Green Tea, Chia Seeds, Flax seeds, Brown rice, Kale, Almond milk, etc.

Let us see where this new journey takes me and my family and how long it lasts....


2/20/13

Quinoa Spinach Soup


What is so special about this soup is the ease with which this can be cooked. I used a pressure cooker to make this soup which helped me cut my cooking time into half. But if you do not have a pressure cooker, no sweat - it can be cooked in a regular stockpot as well. Generally, you will see massive size pressure cookers in an INdian kitchen - one that fits two stacked pots. But I have this handy small pressure cooker as well that I use to cook soups, dals, khichdis etc.

Ingredients and Method:

2 small garlic cloves, peeled and finely diced
1 tomato, chopped
1/2 small red onion
1 carrot, peeled and diced
1 celery, diced
2 handfuls of fresh spinach, washed and chopped coarsely
Dash of garlic powder, onion powder, red chilli flakes, Italian seasoning (as per your taste)
1/4 cup quinoa
1 to 1.5 cup cannelini beans (I used red kidney beans)
2 cups chicken broth or veg broth
Feta cheese

1. Heat oil in a pressure cooker. Add the garlic and sautee till fragrant on low heat.  Add the red onion - sautee until translucent but not mushy on medium heat. (about 3 to 4 minutes)
2. Add the carrots and celery - sautee on medium heat. Sauteeing these veggies before adding the broth brings out flavor of the vegetables (about 3 minutes)
3. Add the tomato and stir. Right away, add the spinach and mix. Add salt, black pepper, garlic powder, onion powder, Italian seasoning and mix. Add the quinoa and stir gently.
4. Add a little water (about 1/2 cup) and pressure cook the mixture for about 3 to 4 whistles. Every pressure cooker is different so you will have to toy around with yours to figure out how many whistles it takes to cook it to the perfect texture you want. I do not like mushy veggies in soup!!!
5. When the cooker is ready to be opened, do so and add 2 cups of chicken broth or veg broth and mix. Add the beans and mix. Let it come to a rolling boil and then reduce and simmer for a 5 to 8 minutes until all the flavors blend together. The soup will thicken up due to the quinoa. You can add more water or leave it as is depending on your choice of thickness.
6. Add feta cheese before serving.


Note:
1. Broths are filled wI do with sodium - even the low sodium ones leave a salty taste in my mouth. So one could do half and half - half broth/half water.
2. If you do not have a pressure cooker, you can simply follow the recipe and cover and cook until veggies are tender.
3. I used red kidney beans in the recipe - but I think white cannelini beans would go much better with this soup.


2/18/13

Tex-Mex Chicken Soup


A very easy yet flavorful and spicy soup recipe - you will surely love this!

Ingredients and Method:

2 garlic cloves, finely chopped
2 green chillies, finely chopped (optional)
1 medium red onion, finely chopped
1.5 tbsp tomato paste
1/2 can black beans, rinsed and drained
1 cup frozen corn, precooked in microwave with water
2 cups of chicken broth
1 cup pulled cooked chicken*
1/2 avocado, chopped for garnish
Few jalapenos
1/8 tsp cumin powder, oregano, onion powder,
Salt and black pepper to taste
Garnish: Lime juice, cilantro
Tortilla chips

1. Heat oil in a stockpot.  Add garlic and sautee. Add the green chillies and jalapenos. Add the onions and sautee till translucent.
2. Add the tomato paste and mix well. Sautee for 5 minutes until a smooth paste is formed
3. Add cumin powder, oregano, garlic powder, onion powder, salt and black pepper.
4. Add the black beans and corn along with the water from the corn.
5. Add 2 cups of chicken broth.
6. Bring to a rolling boil.  Add pulled cooked chicken. Then simmer and cook till the soup condenses.
7. Add cilantro, jalapeno, avocado, and lime juice. Garnish with crushed tortilla chips.


For chicken: Boil water in a separate saucepan. Add salt and stir.  Add 1/2 chicken breast and cook for a 5 minutes. Remove and let cool.  Pull the chicken apart and add to the stock pot.

Note: SKip the chicken and chicken broth for a veg option. Use veg stock or just water. Make your soup as watery or as thick as you wish.

Note: For kids, skip the green chillies.

2/11/13

Soup Recipes

Collection of Soup Recipes


2. Tofu Kimchee Soup:

3. Tofu Manchow Soup:

4. Chicken and Beans Soup:

5. Tortellini Bean Soup:

6. Kolamba

7. Roasted cabbage and corn soup:

8. Veg. Sweet Corn Soup:

9. Jerk Chicken Soup:

10. Chicken Pot Pie Soup:

11. Irani Usal Pav:

12. Masoorichi Dal - Basic Indian Lentil Dal/Soup


Pasta-E-Fagioli Soup


Ingredients and Method:

Butter and Olive Oil
1 garlic, finely chopped
1/2 small onion, finely diced
1.5 tbsp tomato paste
1 15 oz can red kidney beans or cannelini beans (drain them and rinse them in clean water)
2 carrots, cut into pieces
1 stalk celery, cut into pieces
1 tsp kashmiri chilli powder or cayenne
1/8 tsp cumin powder (optional)
Dash of Italian seasoning
2 cups of broth (vegetable or chicken broth) and 1 cup of water
1/2 cup elbow macaroni, cooked as per box instructions.
1/8 cup parmesan cheese
Fresh parsley

Prep: Precook the carrots and celery in microwave (about 5 to 8 minutes)

1. Heat butter in a stock pot. When melted, add garlic and roast for a few minutes.
2. Add some olive oil and add the onions. Sautee until translucent.
3. Add tomato paste, mix well and sautee for a few minutes.
4. Add a little water (you can use the water reserved from cooking the vegetables above) and let cook.
5. Add the Italian seasonings, cayenne or chilli powder, drained kidney beans and stir for a minute or two.
6. Add the vegetables. Add the chicken broth and let it come to a boil for a good 10 to 15 minutes.
7. Add the cooked macaroni. Simmer the soup covered for 10 minutes or so. If you want the soup watery, add the 1 cup of water before simmering.
8. Add the parmesan cheese and mix well. 

For other soup recipes visit the masterpage at http://slurpnburp-mithu.blogspot.com/2013/02/soup-recipes.html


2/7/13

Murgh Hari Mirch


Murgh Hari Mirch means Chicken with green chilies. You can make this dish as spicy as you want depending on the kind of chillies you use! But green chillies, cilantro, and garlic ginger is a must for this dish. And lime juice is just what you need to bring the dish together! The key to this dish is cooking it on slow heat and sauteeting constantly . This process is called bhunna in Indian cooking. This is a simple dish but just requires your time and patience - Enjoy!

1.5 lb chicken (about half of a whole chicken, but I only used bone pieces of that half chicken)
4 green chillies, remove the seeds
1 red onion, finely chopped
1 tsp turmeric powder
1 tbsp ginger garlic paste
1/2 tsp malvani masala or garam masala
Cilantro
Half tomato, remove pulp and diced (optional)
Salt

1. Wash and pat dry the chicken. Cut the chicken into small pieces. This shape of chicken pieces is characteristic of this green chilli chicken dish. You want them in small bite size pieces. And remember to use chicken with bones. If you do plan to add bone and boneless pieces, set the boneless pieces aside until the last stage of cooking. You can add the boneless pieces at that point since boneless chicken cooks faster than bone chicken. Drizzle some olive oil, salt, 1/4 tbsp ginger garlic paste, and 1/2 tsp tumeric powder and using your hands rub the turmeric into the chicken.

2. You will need a steel pan or skillet for this dish. Best is to use a kadai. Heat oil and when hot add the green chillies and let sizzle. Add the onions on medium heat and sautee the onions. Add remainder of the garlic ginger paste and sautee. Using a spatula, constantly keep stirring the contents. This is a Bhuna Chicken dish. Bhuna means slow cooking/roasting on low flame.

3. Now, add 1/2 tsp turmeric powder and some salt and mix. Again keep the heat low and constantly sautee the onions. Add finely chopped cilantro (About a handful)

4. Onions should be cooked, ie transclucent but not totally mushy. Now add the chicken making sure there is not water. From now till the end, you have to constantly sautee the chicken. THe more you sautee or bhuno, the better the dish will taste. Add some garam masala and keep cooking. At some point, you can cover and cook for a few minutes for the chicken to cook without burning. When you cover, it will leave some water in the dish. Check if the chicken is cooked. If yes, then turn the heat up a little and keep sauteeing till the water evaporates. Note that this is a dry chicken dish.

5. Towards the end, I add the chopped tomatoes and let cook for a few minutes. I added the tomatoes just for color but they are not necessary!

Garnish with lime juice. Serve hot. Since this is a dry dish and the chicken is sauteed so much, its best to eat it right away. If you let it cool, the pieces taste a little dehyrdrated. If your palate is towards the spicy side, keep the seeds on the green chilli. Also some green chilies are spicier than others, you be the judge. I used malvani garam masala which is not that strong but is bright red in color. You could use regular garam masla or kitchen king masala.

Saoji Chicken Curry


I do not know what I was more excited about today ?!! The actual Saoji chicken curry or the fact that we were going to eat the chicken curry with pav/bread instead of your regular rotis/rice.  Today's lunch is dedicated to those who grew up in India when chicken curry was made only on Sundays, when you waited till Mahabharat was over to go to the butcher, when garam garam pavs came wrapped in yesterday's newspaper, and when you got excited if there was a comic strip in color in that particular newspaper, and when you fought with your sibling over who will get the precious tangdi piece ;)
 
I have always wanted to know how to make this delicious dish that I had in India once. According to information I found online, Saoji Chicken is native to the Savji community from the Malva region of India. The food is known for its hot and spicy non vegetarian delicacies and savji masala in places where savjis are concentrated in large numbers. Majority of the savji people are non vegetarian and hence preparation of variety of meat dishes is very common in the community. Goat meat, chicken and fish forms major component of Savji cuisine along with other vegetarian dishes. Small family style restaurants called Savjikhanavali or Saoji Hotel / Bhojanalaya, found in large numbers in places like Hubli, Bangalore, Belgaum in Karnataka, Nagpur and Solapur in Maharashtra etc.
This recipe is taken from Sanjeev Kapoor's site. However, I found the recipe was way too masaledar/spicy for the amount of chicken used. So I have reduced the quantity of spices and also quantity of some ingredients. I also added the tadka piece in the end for color.

Ingredients and Method:
 
Chicken 2.5 lbs (Half of a whole chicken, cut up in small pieces)
2 medium onions
Spices:
2 tsp Coriander seeds
1 tsp caraway seeds
4 cloves
8 Black peppercorns
2 green cardammoms
1 black cardammom
2 bay leaves
1 inch cinnamom stick
4 dry red chillies (Byadgi mirchi - which are mostly for color)
1 tbsp poppy seeds
1/4 cup dry coconut
1 stone flower
2 tbsp ginger garlic paste
2 tsp kashmiri chili powder for color (mixed with a little water to make a liquidy)
Cilantro and lime juice for garnish

1. Wash and pat dry chicken. Cut into bite size pieces. Apply salt and half of the ginger garlic paste and set aside.
2. In a skillet, add some oil. Add the onions cut lengthwise.  Cook until they are brown in color. set aside.
2. In a flat bottom pan, dry roast all the spices ie from coriander seeds to stone flower on low flame and constantly stirring the contents so they do not burn. the contents will turn light brown and aromatic. This is when you know you are done. Set aside to cool a bit.  Now make a paste of the onions and the spices using a little water at a time.
3. In a pan, heat oil*. Add the remainder of the ginger garlic paste and sautee till the raw smell goes away. Now we braise the chicken a bit - Braising is the process of browning the chicken on high heat for a minute. This imparts a better flavor to the curry.  Pour the onion paste we made to the chicken and mix well until the chicken is well coated with the masala. Turn the heat to low/med and cover and cook the chicken for a good 20 to 25 minutes checking the curry intermittently. Towards the end of the cooking stage, say about 5 minutes into the end, add kashmiri chili powder water to the dish and mix well. Cook for a nother 5 to 8 minutes. Garnish with cilantro. Cover and set aside. You will see the tarri (masala oil) on the top layer! ENJOY this dish with bread - I used white kaiser rolls but wishing that I had those authentic Pau/Pav from India!


Note:
1. I would highly recommend using chicken with bones in this recipe.
2. When you take oil in step 3, you will need more oil than usual for the tarri (layer of masala oil) to appear on the top.
3. The chillies used should impart a reddish brown color to your dish. I have used kashmiri mirchi to bring that color out in this dish. You can skip that stage if you are not too keen about color.


2/5/13

Murg Achari


Ingredients and Method:

8 Chicken tenderloins
Marinade for chicken:
  - Olive oil
  - 1/4 tsp turmeric powder
  - 1/4 tsp red chilli powder
  - 1/2 tsp ginger garlic paste
  - 1 tsp Shaan tandoori bbq masala
  - 2 tbsp yogurt (only if you are going to grill the chicken*)

For the paste:
- 2 medium onions, finely diced
- 1/2 tsp ginger garlic paste
- 2 tbsp tomato paste
- 2 tsp Shaan Achar Gosth Masala
- Butter
- 2 to 3 tbsp of Kasoori Methi
- Heavy cream

Vegetables:
Cut 1 green pepper into square pieces. Microwave them in a bowl full of water for about 3 to 5 minutes. Peppers should be soft and cooked but not too mushy. Drain water and keep aside.

Step 1: Preparing the chicken.
Wash and pat dry the chicken. Drizzle olive oil and then marinate the chicken with the ingredients listed above and set aside for atleast 1/2 hour.  Bake the chicken in an oven. I used chicken tenderloins so they were cooked in about 15 minutes. If you use regular chicken breast, you may need more time depending on how big your pieces are. Do not overcook the chicken in this process, because when we add it to the curry it will continue to cook more. If you use chicken with bone, the cooking time will increase even more. Safe to use chicken breast or tenderloin if you are going to follow this recipe to the tee!
Note: For optimum results, this curry requires bbq grilled chicken. If you are going to grill the chicken, add the yogurt to the marinade. If you plan to cook the chicken in the oven itself, skip the yogurt as the yogurt leaves too much water.

Step 2: Making the paste
Alright - same as every curry we make...Heat oil, add the ginger garlic paste and stir until raw smell is gone on low heat. Add the onions and sautee till translucent. Add the tomato paste and mix the onions and tomato paste by adding a little water. now begins the cooking stage which will take atleast 20 minutes, keep adding water a little at time and cooking the paste until the onions and tomato paste form a thick lump. Add the Achar Goshth Masala 10 minutes into the paste cooking stage. Throughout this stage, use the spatula to what I call "Stabbing the onions".  Holding the spatula upright, stab the onions so they breakdown faster.  Now turn the heat high and let all the water evaporate, some oil should leave the sides of the paste. Set aside in another bowl.

Step 3: In the same pan, heat butter. Keep the heat on medium. Add kasoori methi and keep stirring the methi in the pan. Methi will burn quickly so keep working the spatula. Stir only for a few seconds. Add the onion tomato paste we made. Add the chicken and mix well. Add very little water and mix well. Add a little tandoori chicken bbq masala for color and mix well. Add a little heavy cream and mix. Cook on medium heat till the curry leaves some oil.

Achari Murgh is ready.


2/3/13

Godi Batat


Godi Batat is a Kasar style recipe that my Surekha maushi (aunt) has been making for years for us. The best part of coming home from college during weekends or holiday breaks was walking into her home in Michigan on a cold snowy night to the aroma of this potato preparation. Many Indian dishes go with a certain other dish - For instance, butter chicken goes so well with Butter Naan or Pulav, Bhendichi Bhaji or Okra goes with regular phulkas, but there is no other way to eat this dish other than with hot steaming rice and ghee laden dal or marathi style varan.

Ingredients and method:

4 medium potatoes, cut in squares
1 medium onion, chopped
1 medium onion, sliced lengthwise
1 inch cinnamon stick
1 bay leaf
Pinch of clove powder
1/2 tsp ginger garlic paste
4 tsp tomato paste
1/4 tsp turmeric powder
1/2 tsp chilli powder
1/4 tsp cumin and coriander powder each
Garnish: Cilantro n Lime

Note: You have to cook this dish in a flat bottom stainless steel pan.

1. Heat oil (a little more than your usual measurement). Add the cinnamom stick and bay leaf.
2. When fragrant, add the lengthwise cut onions. Sautee for a few minutes
3. Add the diced onions and mix and continue sauteeing on low heat till they are translucent and browned.
4. Add the tomato paste and mix together with the onions. Sautee for a few minutes Add a little water and get the paste going. Sautee and cook till oil leaves from the sides of the paste. The onions should be soft and cooked but do not cook till they are too mushy.
5. Add turmeric powder, red chilli powder, cumin and coriander powder and sautee. Add a little water and cook for a few minutes.
6.  Add the potatoes and mix until the potatoes are well coated with the paste. Add some salt and mix.
7. Add some water and cook covered on low heat until the potatoes are tender. Garnish with cilantro and lime.

Note: In Step 7, you wil have to add very little water at a time to keep the potatoes from burning as they cook on low flame. I added water about three times through the process. Remember to cover and cook on low heat.

1/31/13

Chicken Lollipop


Chicken Lollipops are one of my favorite Indian Chinese dishes. If these babies were not fried, I would make them everyday. Perhaps I could bake them next time!!


Ingredients and Method:

Step 1: 4 chicken wings, makes 8 lollipops. Wash, pat dry and skin the chicken wings. Make chicken lollipops ** See below.

Step 2: Marinate the chicken in the following ingredients.  Rub well using your hands and set aside for 1 hour.

1/2 tsp ginger garlic paste
1/2 tsp vinegar
3/4 tsp soy sauce
Pinch of red food coloring
1 tsp ketchup
1 tsp chilli garlic sauce or sambal olek

Step 3: When ready to fry, make a batter with the following ingredients:

4  tbps corn starch
2 tbsp all purpose flour
Salt and Black pepper
1/2 of beaten egg
Make a thick batter set aside.

Step 4: Heat oil and when hot turn to medium heat.  Fry the lollipops by dipping in the batter. Fry it until browned on medium heat. Do not rush this process because the chicken will remain uncooked on the inside. Set aside on a paper towel. Reserve any batter that remains.

Step 5: Making the sauce.

1/2 tsp ginger garlic paste
1/2 finely chopped small red onion
4 scallions, white portion and green portion separated
1 tsp soy sauce
1 tbsp green chilli sauce
1 tbsp red chilli sauce
1 tbsp chilli garlic sauce
1 to 2 tbsp ketchup
Salt/Sugar
Remainder of the batter: By now the batter will thicken up quite a bit, add some cold water and whisk with a fork.

Heat oil.  When really hot, add the ginger garlic. Stir right away so that it doesnt burn. Add the chopped red onion and white portion of the scallions. Keep working your spatula.  Add the green part of the scallions.  When slightly cooked, add the soy sauce, green chilli sauce, Red chilli sauce, chilli garlic sauce or sambal olek, ketchup, salt, and pinch of sugar. Keep the heat on high and keep working your spatula. at this point, i added remainder of my batter that I mixed with water to the pan. The contents will thicken right away when you add the cornstarch.  So add a little more water and keep working your spatula. I added a little more red food coloring at this point because the color was brownish at this point. Adjust seasonings as per your taste.

Add the lollipops to this sauce and toss gently. Serve the lollipops hot with remainder of the sauce on the side.

Note: The thing to remember with Indo Chinese food is that you have to follow your taste when adding these ingredients using this recipe as a template. Garnish with some green onions.


How to make Chicken Lollipops:
1. Cut the chicken wings at the joint
2. Remove the skin
3. Using a knife gently loosen the fibers and muscle attached to the top of the chicken. When loosened, push the meat down with your fingers to make a ball at the end.
4. For the part of the wing that has two bones, remove one bone off. And then follow Step 3 again.

4 wings will give you 8 lollipops!
 

1/30/13

Tadka Dal


Step 1:
1/4 cup masoor dal
1/4 cup toor dal

Wash the dal several times until water runs clear. Pressure cook it for about 6 whistles. When you are able to open the cooker mix well so its mushy

Step 2:

Heat ghee. Add mustard seeds when they sputter add asofoetida. Turn the heat to low.  Add half the curry leaves and let them crisp up a little. Add the onions and cook until slightly browned. Add the tomatoes and mix well. cook for a couple minutes and then add the turmeric powder and mix. Quickly add the cooked dal and stir. Add a little water and mix. Season with salt and brown sugar and red chilli powder.  Let it come to a boil.  Turn the heat off.

Step 3:

Heat ghee in a tempering pan.  On low heat, add the cumin seeds and wait a few seconds. Add the curry leaves and red chilies and wait a few seconds. Add the garlic and roast till slightly browned. Pour gently over the dal.

Serve with rice.

1/29/13

Kolambichi Sheer- Shrimp Curry


This is a relatively simple Manglorean style shrimp curry - its spicy and tangy at the same time. And brings fond memories of my grandmother's kitchen.

Ingredients and method:

10 to 15 shrimps, deveined, washed, patted dry and marinated with salt, a little red chilli powder and a little turmeric powder
1 tsp coriander seeds
8 to 10 whole black pepper corns
1/2 of small onion for the paste and 1/2 small onion for the tempering
1/4 tsp turmeric
1/2 tsp red chilli powder
1/4 tsp tamarind
1 coconut milk can
1 medium tomato, sliced lengthwise
Cilantro and Salt

1. Blend coriander, onion, black peppercorns, turmeric and red chilli powder and tamarind with a little bit of coconut milk to a smooth paste. Now add the remainder of the coconut milk and blend again.
2. Heat oil. Add 1/2 of the finely chopped onion and stir until translucent.
3. Add the tomatoes and sautee for a few minutes.
4. Add the above made paste and mix well and let come to a boil.
5. Add the shrimp, turn the heat to medium and cook for a few minutes until shrimp is cooked.
6. Add coriander leaves to garnish.


Note: Since the shrimp is already a bit salted, adjust seasoning accordingly. The color of this curry should be yellow orangish as shown. If your tamarind is really black, it will change the color of the curry. If the authentic color matters to you then add less tamarind and make it tangy with some lime juice.

Panchamrut


Well today I bring you something different, something unique from a Saraswat Brahmin kitchen. This is called Panchamrut - a spicy tangy dish made from peppers generally made during poojas or festivals not to be confused with the milk prasad that is given at poojas which is also called panchamrut. The picture does not do justice to the fingerlicking taste of this dish. Its definitely a must try!  Credit for this recipe goes to the best cooks of Austin - Hema maushi and Shubhangi mami!!

Ingredients and Method:

2 Salan ki Mirchi peppers or Green Peppers, deseeded and chopped into bite size pieces
1 green chilli
1/4 tsp mustard seeds
Dash of asofoetida
1/4 cup coarsely ground peanuts
2 tbsp brown sugar
1/4 tsp tamarind
Chopped Cashews - 10
Kala Masala - 1/4 tsp (or more as per your taste)

Coconut paste: First roast the following two ingredients on low flame for a few minutes or until light brown color and make a thick paste of them by adding very little water.
Shredded dry coconut - 1/4 cup
2 to 3 tsp sesame seeds

Heat oil.  When hot add, 1/4 tsp mustard seeds. When they sputter, add a dash of asofoetida and cut green chilli. Add chopped peppers and sautee for a few minutes on medium heat.  Add 1/4 tsp turmeric powder and sautee for a couple minutes. Add the coarsely ground peanuts and salt and mix well. Sautee for a few minutes . Add 2 tbsp brown sugar. Add tamarind pulp and mix well. Add a little water and cook for a few minutes. Add some cashews. Add the dry coconut and sesame seeds paste.  Add Maharashtrian Kala Masala or Goda Masala.  Stir well and let cook.

Note: Keep all the ingredients ready because there are so many steps to this. You dont want to overcook the peppers as they get added early on!

1/25/13

Indian Coastal Cuisine

Indian Seafood Recipes

The next best thing to my wonderful husband is my Seafood!!! Okay fine, I will be honest,  sometimes the seafood takes priority over him too. Like when I am in India and my aunt cooks a pot full of delicious crab curry or when I am chowing down my bombil fry or when I have to literally kick him out of the house so I can cook Karandi Fry or Sukhe Bombil Koshimbir. For those who have not heard of these dishes, but love seafood, let me assure you, its like going to heaven and back.

So here is my attempt to capture all the wonderful seafood recipes from the coastal regions of India.  If you look at it, most recipes have the same ingredients - coconut, tamarind, kokums, etc - but small variations from different regions ex adding curry leaves or the way the coconut is added - roasted or coconut milk, bring about the variations in these recipes.  I have tried to accumulate a list of recipes based on different coastal/regions of India.


- Malvani fish curry
- Mori Masala
- Fried Bangda
- Bombil Fry
- Fish koliwada
- Shrimp Tikhale
- Kolambichi Sheer
- Teesracha Sukh
- Kolambi Bhaat
- Kurlicha Sukha
- Sukkat Masala
- Paplet Fry
- Kolambi Fry
- Kolambicha Sukha
-  Sol Kadhi
- Bangdyachi Koshimbir
- Fish Ambotik
- Paplet Kalputi
- Fish Udamethi
- Kolambicha Kalvan
- Kolambicha Bhujna
- Paplet Hirva Masala
- Shrimp Balchao
- Fish Xacuti
- Shrimp Vindaloo
- Lobster Masala


Shrimp Recipes:

1. Kolambichi Sheer
http://slurpnburp-mithu.blogspot.com/2013/01/kolambichi-sheer-shrimp-curry.html


1/24/13

Paneer Bhurji


Ingredients:

I. Tadka:
1 bay leaf
1 inch cinnamom stick
1/4 tsp cumin seeds
1/4 tsp fennel seeds

II. Onion Tomato Paste:
2 medium onions finely chopped
4 tsp tomato paste, heaping tsp
1/2 tsp turmeric powder
1 tsp red chilli powder
1 tsp garam masala powder
3 tsp Shaan Tandoori BBQ Masala
Salt

III. Paneer:
Brought to room temperature and shredded

IV. Heavy Cream (1/2 cup)

Method:

1. Heat oil and add the I. Tadka ingredients.
2. When aromatic, add the II. Onion Tomato paste ingredients starting with onions first, when browned, add the tomato and add a little water and stir until well incorporated. Add the remainder of the II. ingredients and cook for a good half hour until the onions and tomato paste is turned into one big mush. You will have to add a little water at a time to keep the mixture going. At the end the paste should not have any water. Check the seasonings before you add the paneer.
3. Add the paneer and heavy cream.
4. Mix gently keeping the shredded look of the paneer intact. Cook covered on low heat for 5 to 8 minutes.

Serve with naan or roti.

Note: Add heavy cream a little at a time. I have suggested 1/2 cup but add accd to your taste. 
 

1/23/13

Machli Tikki - Fried Fish Bites

A very simple pan fried fish recipe:

2 filets of catfish, butterfly cut
1/2 tbsp garlic ginger paste
1/2 tbsp turmeric powder
1/2 tbsp red chilli powder
1 tsp tamarind pulp
A little mint chutney (take a few mint leaves crush them and add to the marinade)
Salt to taste

Rice flour and Rava (Semolina) to coat

1. Wash and pat dry the fish. I always butterfly cut my fish at its thickest part. So cut the fish filet into half. And then butterfly cut the parts that are thick.
2. Drizzle some olive oil and marinate the fish with the ingredients above.
3. Set aside for 30 minutes in the fridge. Bring to room temperature before frying
4. Coat all the fish filets in the mixture of the flour and semolina and keep ready. Heat oil and add the fish to the pan. Keep heat on medium. Cook for 4 minutes. Flip and cook for another few minutes. Now turn the flame to low and cover and let it steam just a little to ensure its cooked all the way. 
5. Remove the lid and let cook for  a few more minutes on low so they crisp up.

Serve hot.
 

1/22/13

Aleevache Ladoo

 
 Aleev seeds are nutritious bitter seeds that are used in many cultures in cooking. I only found out about them when my mother made ladoos or sweet dessert balls from them. They are packed with Vitamin A and C and folic acid which are necessary for post partum women.  Aleev seeds are consumed are claimed to aid in breast milk production. And from my personal experience, I can surely say that "this works". I brought my aleev seeds from India as a little supply of them goes a long way.
 
When I researched online, I found that Aleev is similar to watercress seeds. Watercress seeds can be bought from organic stores here in the US. But, I cannot strongly confirm both are indeed the same as I have not tried the watercress seeds here.


 These ladoos are so delicious and are not just for post partum women!
 
1/4 cup aleev soaked in 1 cup of water for 6 hours
1 cup shredded coconut
3/4 cup shredded jaggery
3/4 cup rava or semolina
8 to 10 cardamom pods, remove from the shell and powder
1/2 tsp nutmeg, shredded
1/4 cup coarsely ground walnuts
1/4 cup coarsely group khareek (dried dates - available at Indian grocery stores!)
1/4 cup coarsely ground almonds
 Ghee
 
1. Heat some ghee in a pan. Roast the rava or semolia on low heat until fragrant.  Set aside.
2. In the same pan, add the soaked aleev seeds. Add a few tbps of water and cook the seeds constantly working your spatula until all the water from the seeds is evaporated. (the water that you soaked the alieev seeds in)
3. Add the shredded coconut to the pan and stir for 5 minutes.
4. Add the jaggery and keep stiring/mixing until the mixture becomes thick.
5. Then add 1/4th cup water and continue cooking until its bubbly.
6. Then add the roasted rava to the pan and 1 tbsp of ghee - then stir and mix well.  Cover and cook on low flame for about 5 to 7 minutes. Add the cardammom, nutmeg, almonds, walnuts, and khareek/dates and mix well. Cover and cook for another few minutes until the mixture thickens up. Uncover and set aside to cool for about 20 minutes.  
7. Make ladoos with your hands. Makes about 25 medium size ones!


1/21/13

Shepyacha Pani - Dill Seeds Concoction


Note: Shepa or Dill Seeds can be found at an Indian Grocery store.

1/18/13

Chicken Jalfrezie


An Indian dish that hails from when the British ruled India, Jal frezie means a quick, spicy stir fried dish. I have shown a dry jalfrezie made with paneer or cottage cheese. This preparation is a curry style that one can consume with roti or rice. Since this dish is supposed to be spicy, there is an abundance of chillies and chilli powders. Adust seasonings to your taste! Happy Eating.


Method and Ingredients:

2 small chicken breasts, cut into pieces
1/4 red pepper, deseeded and cut ino squares
1/4 green pepper, deseded and cut into squares
1/4 red onion, deseeded and cut into squares
2 green chillies, slit and cut lengthwise
2 medium onions
1 tbsp ginger garlic paste
1 tbsp kasoori methi
1/2 tsp turmeric powder
1/2 tsp red chilli powder
4 tbsp tomato paste, mixed with a little water
1/4 tsp cumin powder
1/4 tsp coriander powder
1/4  tsp garam masala powder
Pinch of cardammom and cinammon powder
Little vinger
Cilantro

Prep by marinating the chicken: Wash and pat dry chicken. Drizze olive oil.  Add 1/4 tsp each of red chilli powder and turmeric, a little salt, and mix well.  Set aside.


1. Heat oil in a pan. Add the green chillies and sautee.
2. Add ginger garlic paste and roast - do not burn
3. Add kasuri methi leaves and roast -Work fast as these contents can burn easily
4. Add the chopped onions and mix well.
5. Add turmeric and red chilli powder
6. When onions are soft and the masalas are mixed in well, add the tomato paste mixed with water, mix well and keep stirring till the masala incorporates well. You may have to add a little water at a time to cook the onions and tomato paste to one incorporated mush! Add all the other spices now - cumin powder, coriander powder, garam masala, a pinch of cinnamom powder, a pinch of cardammom powder and salt. 
7. Its time to add the chicken pieces. But make sure there is no water at this time. Lets roast the chicken in the masala on high heat so we can brown the meat at bit. After stir frying the chicken pieces for a few minutes, add a little water, add the veggies and mix well.
8. Cook uncovered for 4 to 5 minutes till the chicken and veggies are coated well with the masala.
9. Add some vinegar. Garnish with cilantro.

Note: You can even blanche (meaning add contents in hot water to partly cook them) the vegetables ahead of time. Do not overcook the veggies - they have to have a light crunch to them.
 

1/16/13

Paneer Jalfrezie

Paneer Jalfrezie is an Indian version of a stir fry. However, I have seen dry (low fat) and gravy style (with cream) versions of this dish. This recipe is a low fat one that was shown on Sanjeev Kapoor's show. You can even make kati rolls/burritos with this preparation.

Ingredients and Method:

7 oz paneer cubes, cut into small bite size pieces - found in Indian grocery stores
1 medium red onion
1/2 tsp chopped garlic
1/2 tsp chopped ginger
Half red pepper, deseeded and cut lengthwise
Half green pepper, deseeded and cut lengthwise
Half yellow pepper,  deseeded and cut lengthwise
1 tomato, pulp removed completely and cut lengthwise
1/4 cup lengthwise carrots
Spices:
1/4 tsp cumin seeds
1/2 tsp red chilli powder
1/4 tsp turmeric powder
1/4 tsp cumin powder
1/4 tsp coriander powder
1/4 tsp vinegar
Salt
Cilantro for garnish


1. Heat oil in a skillet. When hot, add cumin seeds. Add the ginger and garlic and roast for a few minutes.
2. Add onions cut lengthwise. Cook them for a few minutes - should be cooked but not too mushy
3. Add the carrots and let cook for a few minutes
4. Add all the peppers and continue tossing. Add the paneer.
5. Add all the spices and salt - let cook
6. Add vinegar and cilantro

Serve right away as the recipe gets dry over time. Best consumed with Kawan Paratha.

Note: Like every stir fry the veggies should not be too soft. Cook on med to high heat and keep tossing the veggies. I found this recipe a little dry if it is to be consumed with chapati or paratha. So, toward the end I added a little water and then let cook for a few minutes till the water is a bit reduced.

Note:I like my paneer a little stir fried. So before adding to the pan, I stir fried the pieces in a flat skillet in some oil.

Note: One can add beans, peas, asparagus, baby corn any veggies to this dish. Adjust the seasonings accordingly.
 

Jeera Rice - Microwave recipe!


Ingredients and Method:

1 cup Basmati rice
1.5 tsp cumin seeds
Ghee

Spices:

1 star anise
1 inch stick of cinnamon
2 cloves
1 cardammom, opened
1 bay leaf


1. Wash rice several times under runing water in a microwave safe bowl.  Soak the rice in water for 5 to 8 minutes. Drain water. 
2. Now add 2.5 cups of water.  Add salt and drizzle some olive oil and mix gently otherwise rice will be tender and break.
3. Cook in the microwave for 15 minutes - if water is still remaining cook again for another 5 minutes and repeat. If  Since microwave times vary, you may have to trouble shoot a few times to get it right but this method is so easy. If at the end of 15 minutes you feel the water is less and rice is still uncooked, add a little more hot water to the rice and cook.
4. Set aside. After a few minutes, pour gently in a flat pan to let all the steam escape to keep the rice dry. Let cool completely
5. Heat ghee in a pan. Add the spices. When aromatic, add the cumin seeds. When they sputter, add the rice and gently toss with a spatula or just toss the pan to coat well.

Jeera rice is ready!

Note: If you do not have the spices, you can skip that part.

Murgh Makhni - Butter Chicken


Butter chicken or Murgh Makhni is the mother of all dishes when it comes to Indian food! You can either make it from scratch or use my "fool proof" version. Credit for this recipe goes to my amazing husband though who is one amazing cook. I use Shaans Chicken tandoori bbq masala - there are other ways to make butter chicken but if you want this recipe do not proceed ahead unless you have this masala!

Ingredients and Method:

Step 1:Marinate the chicken

2 chicken breasts (Mine were really thick ones from Costco, so I butterfly cut them and then cut into small pieces)
1 cup full fat yogurt (preferrably hung)
2 tsp red chili powder
2 tsp turmeric powder
2 tbsp shaan tandoori bbq masala
1 tsp ginger paste
1 tsp garlic paste
A little salt (the masala packets are loaded with salt already)

In a bowl, mix together all the ingredients. Drizzle some oil over the chicken and pour the marinade. Mix well. I truly find using my hands to mix the marinade in yields better results. Its all about the love baby! Set aside for 4 to 6 hours atleast. When ready, bring to room temperature. For best results, grill the chicken pieces in a BBQ grill. Or you can also cook them in an oven at 350F until meat appears white on the inside. Do not overcook as we have to still simmer the pieces in the curry. Its okay if the pieces are a bit undercooked. When you cook the pieces in n oven as opposed to the grill, the yogurt will leave some water. Reserve the water aside as you can use it in the curry.

Step 2: Making the curry

Butter (I used margarine!)
2 medium onions, finely chopped
1 tbsp ginger garlic paste
10 cashews, soaked in warm water for 10 minutes and blended into a t hick paste
1 tbsp kasoori methi (dry methi leaves) - An absoulte must!
2 heaping tablespoons tomato paste
1 tsp turmeric powder
1 tsp red chilli powder
1 tsp cumin powder
1 tsp coriander powder
1 to 2 tbsp Shaan Tandoori masala
1 tsp garam masala
Heavy cream (to your own taste but atleast 1/4 cup)

Spices:
1 bay leaf
Pinch of clove powder
1/2 inch cinnamon stick
2 green cardammoms, opened
1 tbsp kasoori methi - absolute must! (I like the taste of Kasoori so I generally add a little more than 1 tbsp!)


Heat butter in a pan. When hot, add the onions and start sauteeing them. Add the ginger garlic paste and cook until the raw smell of ginger garlic goes away. Add the tomato paste and mix well. Add a little water to get the paste going. Add the turmeric, red chilli, cumin and coriander powder. Add a little water a time and keep cooking the paste until the onions and tomatos are completely mushy and cooked.  Add the cashew paste and continue cooking for 5 minutes more.  Now add the Shaan Tandoori Bbq masala and continue cooking. Add a little water each time if the paste gets too dry. Butter chicken has gravy but its not watery. Set aside. When cooled, blend it to a thick paste.

Heat a little oil or butter in the same pan. Add a bay leaf, clove powder, cinnamon stick and cardammom. When fragrant, quickly add the kasoori methi and using your spatula keep whisking to avoid the methi from burning.

Add the blended paste and stir. Now add the chicken pieces and mix. You should have a thick gravy by now. Add a little water if necessary. Add the heavy cream as per your taste and dietary restrictions. But add a little at a time and stir after you add it each time. The color of the gravy should change from reddish to orange. You dont want the gravy too milky so add the heavy cream accordingly.

Serve with naan or jeera rice.
 

1/11/13

Post-Partum Recipes

On Dec 11, 2012 I was blessed with a healthy baby girl.  My four year old son was probably the most happiest of us all as he really wanted a baby sister. And now starts the cycle of feeding, burping, changing diapers, night duty, etc etc etc. But the fun part is all the food. During my first pregnancy, I gained more weight after pregnancy than during - okay fine I am exaggerating a bit but my day started with ladoos and ended with ladoos with lots of sweet ghee laden sheera and chapati/baji in between. I was loving it all but weight loss was really a struggle. So this time around, not only did I watch what I ate during my pregnancy but even post partum, I have put a "as needed" rule as opposed to "must eat" rule.

Post partum care is taken very seriously in India. So with my mother here taking care of business, she has been putting some old school rules down on me:

1. Complete isolation from the outside world for 40 days
2. Daily full body oil massages for mom and baby
3. Tucking the tummy tight with a belt or sari
4. Following a strict post partum diet

Okay get real - its me you are talking about. I had three huge house parties, did complete house reorg, cooked 30 meals and blogged the recipes, and played soccer everyday with my 4 year old within those first 40 days. Hopefully I will still be okay when I am old and gray :) Anyhow, I thought it would be neat to share some of my yummilicious foods I get to eat. these are standard recipes/dishes you will see followed in many Indian households for post partum mothers. This is a master list of some of the recipes. Click on the link below each title to go to the recipe. The ingredients used in these recipes claim to have several benefits - aid in digestion and milk production, promote healthy bones and teeth, provide energy, etc.

I. Soups:
- Chicken soup
- Rasam
- Vegetable soup
II. Masala doodh - Milk
III. Aleevache ladoo - Dessert balls made from special seeds called aleev
http://slurpnburp-mithu.blogspot.com/2013/01/aleevache-ladoo_22.html
IV. Dinakcha ladoo - Dessert balls made from edible gum
V. Methi ladoo - Dessert balls made from fenugreek leaves
VI. Methi Danay Bhaji - Methi seeds preparation
http://slurpnburp-mithu.blogspot.com/2012/03/dana-methi-fenugreek-seeds.html
VII. Gavhacha sheera - Dessert made from wheat flour
VIII. Aleevachi kheer - Condensed style milk with alive seeds
IX. Rava sheera - Dessert made from cream of wheat
X. Karela sabji - Bittergourd preparation
XI. Khus Khus Poli  - Poppy Seeds in a chapati
XII. Shepyacha Pani - Concoction of Dill Seeds
http://slurpnburp-mithu.blogspot.com/2013/01/shepyacha-pani-dill-seeds-concoction.html
 

1/9/13

Baida Biryani - Spicy Egg Pilaf


I am not the kind of girl who will make biryani from scratch. Why reinvent the wheel when someone has already done the work for you. There are so many different Biryani masalas available out there - just buy a packet and do rest of the work and each time you will have a different flavored biryani. I love Shaan Masalas for my biryanis. And Bombay Biryani Masala is my absolute favorite, closely followed by Sindhi Biryani Masala. I am indifferent towards Malay Biryani Masala but does work when none of the other contenders are available. Do you have a favorite Biryani masala or a brand that you would recommend?

Ingredients and method:

1.5 cup white rice, cooked in microwave
6 to 8 eggs, hard boiled, peeled and cut into half
Cilantro and Mint leaves for layering

Spices:
1 bay leaf
1/2 inch cinnamon stick
4 black peppercorns
1 badi velchi (big cardammom)
2 cardammoms, opened
1 star anise
4 cloves

1 large onion, thinly sliced
1 to 2 green chilli
3 heaping tbsp of Tomato paste (not tomatoes, not tomato pulp, not tomato puree!)
1 tbsp ginger garlic paste
1 tsp turmeric powder
1 tsp red chilli powder
1/4 tsp cumin powder
1/4 tsp coriander powder
Shaan Bombay Biryani Masala
Orange food color (literally two grains!)

1. Heat ghee in a pan
2. Add the spices and gently roast till aromatic
3. Add the onions and green chillies and sautee till browned.
4. Add the tomato paste and a little water and mix. Add the ginger garlic paste, turmeric powder, red chilli powder, cumin and coriander powder and sautee until the ginger garlic are well roasted. Keep sauteeing and cooking the onions and tomato paste together until the paste leaves oil on the side.
5. Add 2 heaping tbsp of Bombay Biryani Masala and mix well. Paste should be thick and wet but not too watery. Season with salt.
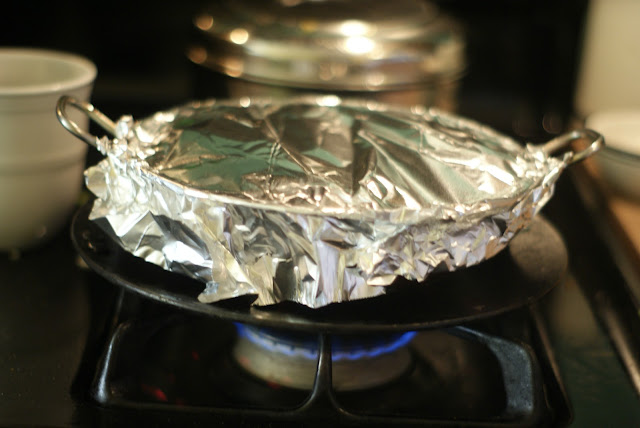
6. Layering and Dum* time:  First put masala on the bottom of a small narrow pan. I used a kadai. Then layer half the eggs opened face down on the masala.  Now add half the rice. Layer chopped cilantro and mint leaves.   Add remainder of the masala followed by remainder of the rice. Reserve maybe 1/4 cup rice to side. Mix orange food color and toss. Layer on top. Put foil on the top.  Apply dum on low flame for half hour making sure its not burning at the bottom. I kept the kadai/pot on a thick tava/skillet  See pic below!!


Note: Dum is the process slow cooking by generating steam in the pot to cook the biryani.

1/8/13

Methi Mutter Malai


I hope those who try this recipe will like the dish as much as how neat this picture turned out!!
 
Ingredients and Method:
 
1 cup green peas - I used frozen ones, thawed them, and then cooked them in microwave submerged in water for about 3 to 4 minutes (Microwave times may vary)
1 cup cut methi - I used the fresh kind.
6 cashews - Soaked in water for 10 minutes

1 medium onion, finely chopped
2 small green chillies
1 tsp turmeric powder
1 tbsp chopped ginger pieces
1 medium clove garlic, chopped
1 bay leaf
1/4 tsp cumin seeds
Pinch of cinnamon powder
Pinch of cardammom powder
1/4 cup heavy cream
Some honey

Prep: Before beginning to cook, blanche the methi leaves. To do this, boil water in a stockpot.  Add the methi leaves and let blanche for 8 to 10 minutes.  Methi leaves should change color - if not blanche a little more. Set aside.
1. Heat oil in a stainless steel flat bottomed pan. Add the onions and green chillies and roast till onions turn translucent.  Add the ginger and garlic and continue sauteeing . Add the turmeric powder and continue cooking. (I cooked the onions for about 10 minutes on medium flame adding a little water at a time.  As the water evaporates, keep adding a little more so the onions cook all the way.) Set aside to cool a bit
2. When cooled, add the onion masala to a food processor or blender. Add the soaked cashwews and process or blend the onion masala and cashews together to a paste. I added some water to get the paste going.
3. Now heat a little oil or ghee. Add a bay leaf.  Add 1/4 tsp cumin seeds. When they sputter, add the onion/cashews paste and mix well. Add a small pinch of cinnamom powder and cardammom powder. Add the peas. Drain the methi leaves and add the methi leaves and mix well.  Add the heavy cream and mix. Drizzle a little honey and stir.  Keep uncovered and cook on low heat until the gravy gets thick to your preferred consistency. If its too thick, add a little (very litte) water and mix well. Season with salt.


Gobhi Masala


Gobhi meaning Cauliflower is a very tricky vegetable. Two seconds delay in cooking time and you got yourself a Mush Masala instead of Gobhi Masala. So two main tips for this prepartion - 1) Use a non stick pan and 2) Do not walk away from the stovetop unless you are a pro!

Ingredients and Method:

Half cauliflower, cut into small florets
1 small onion, finely diced
1 small potato, chopped into small pieces
1 tsp cumin seeds
Dash of Asofoetida
Bay leaf
1/4 inch cinnamon stick
1 tsp garlic ginger paste
1 tsp cumin powder
1 tsp coriander powder
1 tsp turmeric powder
1 green chilli
1 tsp red chilli powder
1 tsp garam masala powder
1/2 tomato, deseeded and diced
Cilantro for garnish
Lime for garnish

1. Heat olive oil in a pan. Add bay leaf and cinnamom stick. Add the cumin seeds. When they sputter, add asofoetida or hing.
2. Add the onion and sautee till translucent. Add the ginger garlic paste and roast.
3. Add the diced potatoes, cover and cook on low flame till potatoes are half way cooked.
4. Add the turmeric powder, cumin powder and coriander powder, and garam masala powder. Mix well and continue to cook the paste for another few minutes.
5. Add the cauliflower and mix well. Drizzle some olive oil over the side of the pan. Toss the vegetable so that the the cauliflower is well coated.  Now add about 1/4 cup of water. Cover and cook for about 3 to 4 minutes on low heat.
6. By now the cauliflower should be almost cooked with just a little water left. 
7. Turn the heat up high now, and keep tossing until water is evaporated. Drizzle some olive oil again (or skip!) but keep tossing the pan and the contents.

Garnish with cilantro and lime juice.


1/4/13

Vegetable Makhni


A delish vegetable preparation of vegetables simmered in spices and cream sauce.

Ingredients:
1/2 cup green peas, partially cooked
1 cup cauliflower florets
1 cup carrots, chopped in bite size pieces
1 cup green beans, partially cooked
10 bite size pieces of paneer (optional)
1 cup heavy cream
1 tsp cumin powder
1 tsp coriander powder
1 green chilli
1 tsp garam masala
2 tbsp cashewnut paste
1 tbsp ginger garlic paste
3 heaping tbsp tomato paste, mixed with water
Kasoori methi
Spices:
1 bay leaf
1 star anise
1/4 inch cinnamon stick
1 badi velchi
2 cloves
1 cardammom pod, opened

1. Heat oil in a pan. Place paneer pieces and roast on each side for a few minutes until browned. Set aside. In the same pan, add the caulilflower florets, season with salt and a pinch of cumin and coriander powder. Keep tossing until lighly browned.  Set aside. You can skip these steps and directly add the vegetables and paneer to the pan when we make the sauce. But I like to season and brown the vegetables a bit because it adds some extra flavor especially to paneer and cauliflower as they tend to be a little bland.
2. In a microwave, partly cook (about 5 minutes) carrots and beans in water. Drain and set aside
3. In a stainless steel pan, add 4 tbsp butter. When melted, add all the spices listed above. Add the ginger garlic paste and keep stirring. Add the cumin and coriander powder and green chillies and keep stirring so as to not burn.  Add the cashew nut paste and keep stirring. 
4. Now in a bowl, mix tomato paste with about 1/2 cup water and beat well.
5. Add the tomato paste mixture to the pan and blend well. Cook for about 3 to 4 minutes. You may have to add a little water to keep the curry going.
6. Add the cauliflower florets, carrots and beans and cook uncovered.  Add garam masala and cook. Add the heavy cream and stir. YOu can add extra heavy cream if you like the curry creamier.  Mix well. Add the paneer and kasoori methi. The heavy cream will leave a little bit of oil on the side. When you get a thick yet gravy style consistency, veg makhni is ready.

Serve with rice or naan.

Note: Add paneer cubes to the above dish to make paneer makhni.
 

1/3/13

Lemongrass Chicken Curry


A quick and easy chicken recipe that will have you lickin' your fingers - if you eat Indian style that is :)

Ingredients and Method:

1 chicken breast
1/2 onion, finely chopped
5 stalks of green onion
1 or 2 green chillies, slit lengthwise
6 cherry tomatoes, cut into half
1/8 cup green peas, cooked in a microwave
1/4 cup coconut milk - dilute it with water
1/4 tsp turmeric powder
1/8 tsp turmeric powder for chicken breast
1/4 tsp cumin powder
1/4 tsp coriander powder
1/2 tsp garlic paste
1/2 tsp ginger paste
1 tsp finely chopped and crushed lemon grass (you can food process it to a paste)

1. Wash and pat dry chicken breast. Cut the breast into half sideways if the breast is too thick then cut lengthwise. Drizzle with oil. Season with turmeric, salt and black pepper.
2. Heat oil in a pan. Add green chillies and sautee for a minute.  Add the onions and white portion of green onions and sautee on low heat till brownish transclucent.  Add a little water and continue cooking.  Add the turmeric powder, garlic and ginger paste, lemongrass paste, and continue cooking till a thick paste is formed.
3. Add the tomatoes and cooked green peas and sautee
4. Now turn the heat high, add a little more oil, and add the chicken breast. Keep the pan moving as the chicken cooks. Chicken breast cooks really fast so do not cook more than 3 minutes or so.
5. Now add the coconut milk and mix well. Turn the heat to medium and keep stirring. Add some salt.  Check for chicken's doneness before serving.
Garnish with the green part of the green onions.


1/2/13

Dabeli Chaat


Chana Chaat or Garbanzo beans chat is a popular appetizer chaat dish. But I have made a Dabeli Chana Chaat here. Dabeli Roti is a popular street side food made of potaotoes, pomegrantes, and peanuts. I thought of marrying the two dishes to make this delicious quick and easy appetizer dish.

Ingredients and Method:

1 can garbanzo beans
1 Boiled potato, cut into small bite size pieces and lightly seasoned with salt
1/2 small red onion, finely chopped
1/2 medium tomato, deseeded and finely chopped
1/2 to 1 tsp Chaat Masala
1/2 tsp roasted cumin powder
1/4 tsp Amchur Powder (optional)
1 to 2 green chilles, finely chopped
1/8 cup pomegranate seeds
1/8 cup dry roasted peanuts (Planters brand)
Salt
Olive oil

Chutneys:

1 to 2 tbsp tamarind chutney (mixed with a little water)
1 to 2 tsp garlic chutney
1 to 2 tsp coriander chutney (optional)

Garnish: Thin sev and Cilantro

1. Cut potatoes in small pieces. Boil potatoes in a microwave (soaked in water). Drain water and let potato cool completely.
2.Drain garbanzo beans and put them in a colander. Run water until completely washed. Let dry completely.
3. In a bowl, add garbanzo beans. Drizzle some olive oil and toss until evenly coated. Now add all the remainder of the ingredients, chutneys and toss again.
4. Right before serving, garnish with sev (quantity depends on your choice) and cilantro.
 

1/1/13

Typical Indian Restaurant Style Recipes

 
Typical Indian Restaurant Style Recipes
 

Chicken Tikka Masala, Lamb Rogan Josh, Paneer Makhanwala - these are the kind of recipes my Non-Indian food cooking friends list when I ask them what their favorite Indian dish is. The truth is that though Indians do not eat these dishes on an everyday basis. Mostly these dishes are seen on a restaurant menu or at Indian homes on special occasions. However, it is understandable why these deliciously rich dishes are often a crowd-favorite.  This is my attempt to try to make these restaurant style recipes.  So, I have taken a sample menu of an Indian restaurant which will act as a master file for my recipes collection.  Click on the links for individual recipes.


I. Appetizers
- Chaana Chaat*: http://slurpnburp-mithu.blogspot.com/2013/01/dabeli-chaat.html
- Samosa
- Vegetable Pakora
- Jheenga Pakora
- Murgh Pakora
- Onion Bhajia

II. Accompaniments:
- Papad
- Raitas
- Pickles

III. Tandoori Specialities
- Chicken tandoor
- Murgh Tikka
- Boti Kebab
- Seekh Kabab
- Fish Tikka
- Tandoori Jheenga

IV. Chicken Specialities
- Chicken Shahi Korma
- Chicken Makhani: http://slurpnburp-mithu.blogspot.com/2013/01/murgh-makhni-butter-chicken.html
- Chicken Jalfrazie: http://slurpnburp-mithu.blogspot.com/2013/01/chicken-jalfrezie.html
- Butter Chicken: http://slurpnburp-mithu.blogspot.com/2013/01/murgh-makhni-butter-chicken.html
- Chicken Tikka Masala
- Chicken Vindaloo
- Chicken Madras
- Chicken Saag
- Chicken Achari/Murgh Achari: http://slurpnburp-mithu.blogspot.com/2013/02/murg-achari.html

V. Lamb:
- Karahi Gosht
- Saatg Gosht
- Gosht Vindaloo
- Rogan Josh
- Dal Gosht

VI. Seafood:
- Macchi Masala
- Jheenga Masala
- Shrimp Vindaloo
- Shrimp Saag

VII. Rice:
- Jeera Rice: http://slurpnburp-mithu.blogspot.com/2013/01/jeera-rice-microwave-recipe.html
- Vegetable Biryani
- Chicken Biryani
- Shrimp Pulao
- Lamb Biryani
- Egg Biryani: http://slurpnburp-mithu.blogspot.com/2013/01/baida-biryani-spicy-egg-pilaf.html

VIII. Vegetarian Specialties:
- Daal Tarka
- Channa Masala
- Malai Kofta
- Saag Paneer
- Paneer Jalfrazie: http://slurpnburp-mithu.blogspot.com/2013/01/paneer-jalfrezie.html
- Vegetable Jalfrazie:
- Baingan Bhurta: http://slurpnburp-mithu.blogspot.com/2011/09/apis-baingan-bhartha-eggplant-dip.html
- Aloo Gobhi Masala: http://slurpnburp-mithu.blogspot.com/2013/01/gobhi-masala.html
- Navartan Korma
- Paneer Makhani: http://slurpnburp-mithu.blogspot.com/2013/01/vegetable-makhni.html
- Vegetable Makhani: http://slurpnburp-mithu.blogspot.com/2013/01/vegetable-makhni.html
- Methi Mutter Malai: http://slurpnburp-mithu.blogspot.com/2013/01/methi-mutter-malai.html
- Paneer Bhurji: http://slurpnburp-mithu.blogspot.com/2013/01/paneer-bhurji.html

IX. Dals

- Tadka Dal: http://slurpnburp-mithu.blogspot.com/2013/01/tadka-dal.html

X. Indian Breads
- Naan
- Chapati
- Poori
- Kulcha

XI. Desserts
- Kher
- Gajjar Halwa
- Gulab Jaman
- Ras Malai
- Kulfi Ice Cream
- Lassi
- Mango Lassi
- Chai


* Restaurants just have regular Chana Chaat. They do not add pomegranates or peanuts in the dish. I thought of making something different, hence, its called Dabeli chaat. You can eliminate pomegranate seeds and peanuts for a regular Chana Chaat.